
3. Placing Components
While the components are very small, good techniques can make placement much simpler and more accurate.
Hot tip: Practice the component placement on a dry board without solder paste first. Trial the placing and fit of the Pico, Microphone, OpAmp, (and slide switch, audio jack and/or brooch if used). It is actually harder to do this dry, as they move around more without the paste, but it is really good practice.
Hold the tweezers in a pen-like grip. If using cranked (bent) tweezers, then ensure the tip is vertical, not horizontal. This helps to avoid knocking components already placed.
Keep your hand in a natural position without stretching. Do not bent your wrist to reach a different part of the board, or reach across from one side of the board to the other. Instead rotate the mat and board.
Do not hover your hand above the board. Instead keep your hand steady by keeping the heal of your hand firmly grounded, and your fingers resting on top of each other. You can use the index finger of your other hand as a brace for extra stability if needed.
Check the value and alignment of the text on the board, this (usually) shows the type of component, and the orientation, which is in the same direction as the text. If in doubt always follow the latest component layout for your board version.
Pay particular attention to component orientation when two similar-valued components are next to each other.
Align the component with the board on the mat before picking them up. Make sure they are the right way up and ideally with resistor values the same way as shown on the board.
Remember some only fit one way (polarity).
Place the components in the order they are shown on the component layout. Start at the top of the list (always Pico) and then work down in order.
The order is chosen so the hardest are placed first, so if any errors are made, the fewest number of components have to be removed, before the paste is wiped off, then re-applied.
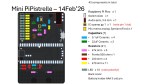
To place the Pi Pico, a tip Phil taught us is to insert the fingernail of your left hand into the mUSB socket and support the other side with your right hand.
Lower the left (mUSB) end of the Pico onto the board, aligning the dot on the board with the hole in the Pico.
Then lower the right end of the Pico, again aligning the two dots on the board with the holes on the Pico.
The slide switch and the audio jack both have two knobbles on the bottom, that fit into holes on the board to securely locate them. Ensure these are firmly located in the holes. It is worth practicing these two dry, as the audio jack in particular does not align with the centre of the silver pads on the board.
It is especially important to check the orientation of the Microphone. While it does have some markings on top, these are so faint they cannot be relied upon. Hence pick up the Mic in the tweezers and turn it over to check the correct orientation of the metal contacts (two squares and a ring) with what you see on the board.
The integrated circuits (IC’s) such as the Op-amp can only be fitted one way. A dimple on top black surface of the IC marks which is pin 1, and there is a dot (or star) on the board to also indicate where pin 1 goes.
Confusion is easily avoided now, as the current single channel Op.Ap has three legs one side and two the other, hence can be confidently placed without looking up pin1.
Pick up 1206 sized components; capacitors, LED and resistors, across the width. This ensures the tips of the tweezers are kept away from the solder paste, and helps avoid components sticking to the tweezers.
Always aim to place the ends of the components in the centre of the silver solder pads of the board.
The light emitting diodes (LEDs) also have polarity and can only be placed one way round. The LEDs are bottom firing, with a protruding lens on the underside that fits into a hole on the board. The top surface has a green “T” shape, where the tail of the “T” has to be connected to ground . Always follow the latest component layout for your board version to see which way around the T shape goes.
Lastly, always remember to plan your movements ahead, so you don’t knock components already placed!
Next Page >

