Ordering from PCBWay
The designer Phil has made his Printed Circuit Boards, solder paste stencils and 3D printed back covers available from PCBway in China. Delivery to UK usually takes 8 to 12 working days from ordering.
Visit the “Phil Phil Atkin” page on PCBway to see all his designs:
Click on the device you are interested in. Then there are three stages to the ordering process:
- The Ordering of PCB’s (in batches of 10) …
- and ordering Stencils for each PCB design (Frameless) are done together.
- Then order 3D print back covers (if required)
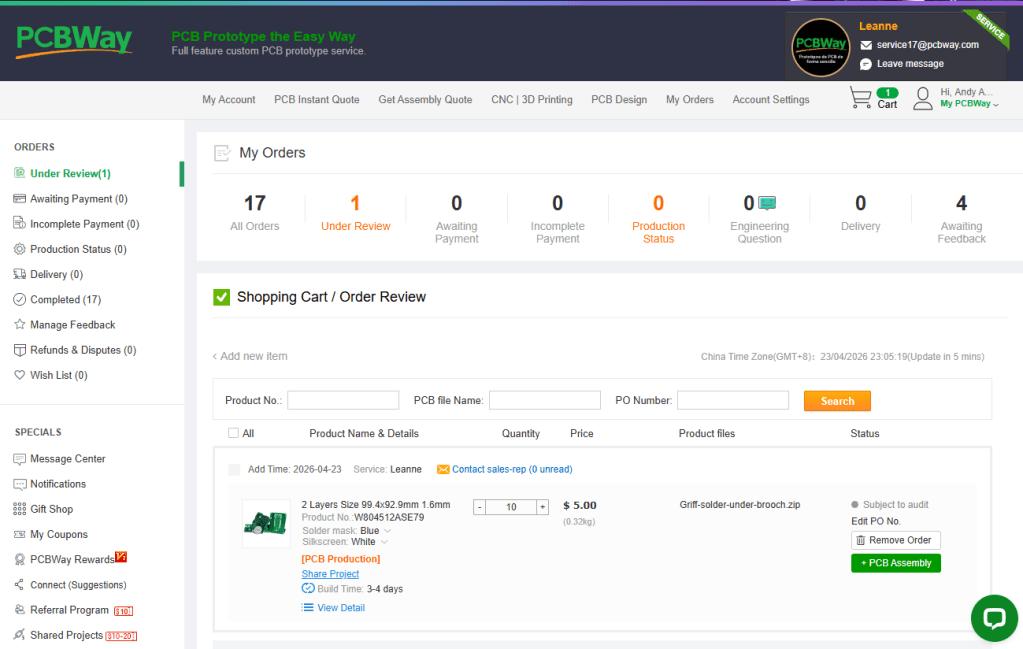
1. Order PCB’s
These should cost $5 for 10, plus shipping cost.
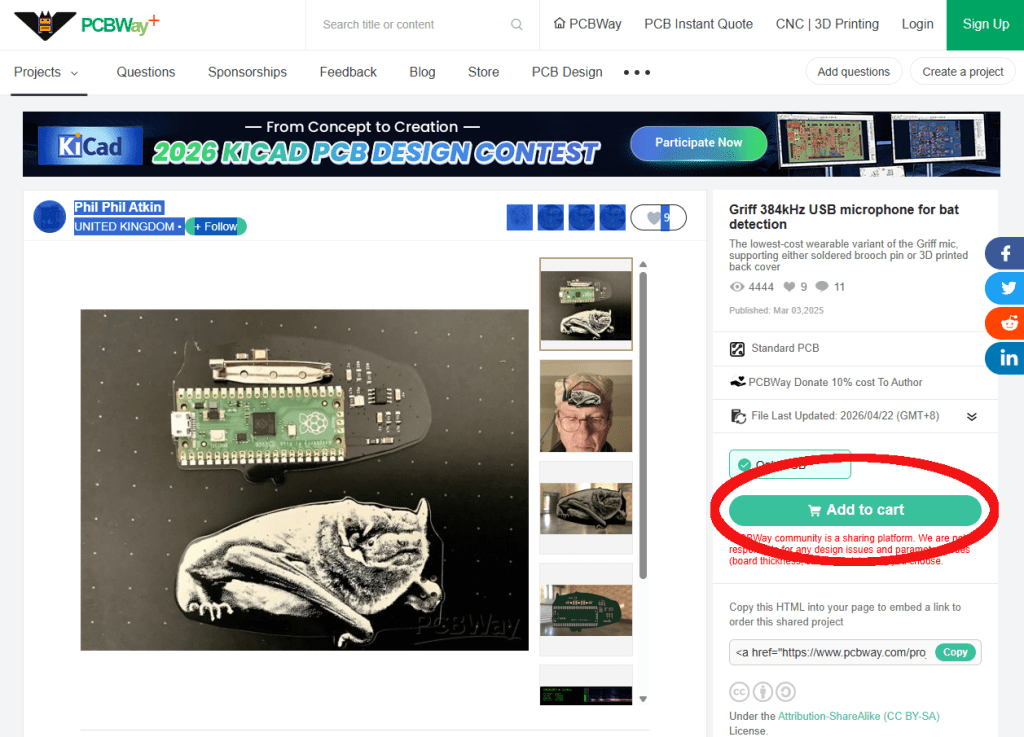
First click the green button “Add to Cart” on the left of the screen, as shown circled in red on this image.
You may need to login (or sign-up) at this point.

On the next screen you only need to change 3 fields. These are listed below, and also shown circled in red.
Leave everything else as its default.
- Quantity (single) = 10 pcs
Reason: 5 cost the same as 10 ($5). Then if you go over 10 they cost LOADS more. If you need more boards repeat the process choosing different colours. - Solder Mask = Green, Red, Yellow, Blue, White or Black
Reason: Purple, Matte black or green & None are more expensive.
Leave the Silkscreen below at its default. It will be White, unless you select White Solder Mask when it changes to Black. - Shipping Cost = Your country and “Global Direct”
Reason: Global direct is cheapest/fastest. Customs duties and VAT are not paid, but I have never had an issue with them over many orders.
Click here to see all the default values
- Board type = Single pieces
- Different design in panel = 1
- Size: is generated automatically from the “PCB file”
- Quantity = 10 (changed from default of 5!)
- Layers = 2 Layers
- Material = FR-4
- FR4-TG = TG 150-160
- Thickness = 1.6mm
- Min track/spacing = 6/6mil
- Min hole size = 0.3mm
- Solder mask = Change to Green, Red, Yellow, Blue, White or Black (from default of Green)
- Silkscreen = white (usually, unless While solder mask selected)
- UV printing Multi-colour = None
- Edge connector = No
- Surface Finish = HASL with lead
- Via Process = Tenting vias
- Finished Copper – 1oz Cu
- Remove Product = No
2. Order solder paste Stencil
To accurately apply the solder paste to the PCB’s you will need a specific SMD stencil for each device (and each version of that device). Each stencil should cost $10 plus shipping cost.
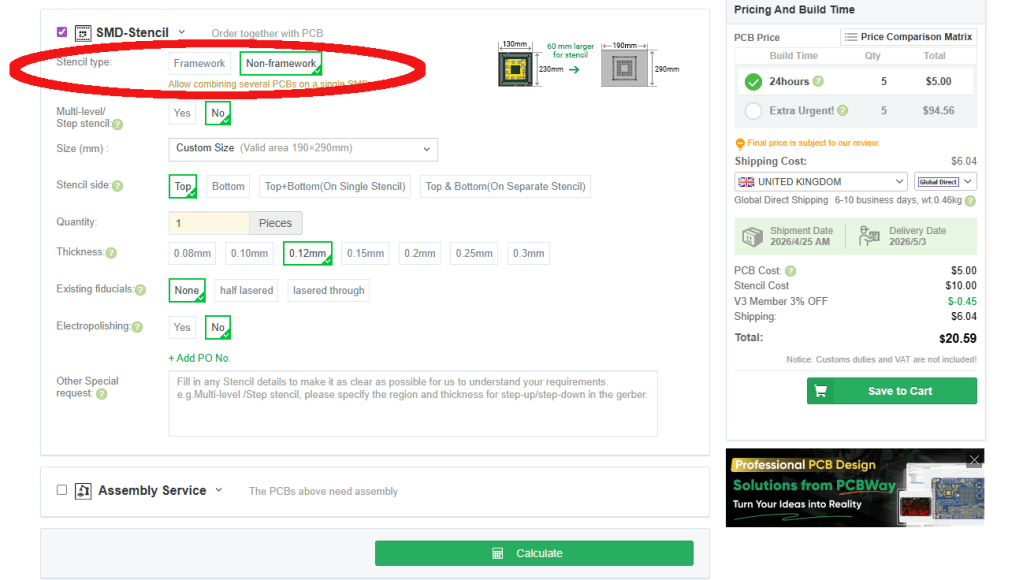
Scroll down on order page to the “SMD-Stencil section and click to expand it. You only need to change one field as below, and also shown circled in red:
- Stencil Type = Non-framework
Reason: “Framework” stencils will work, but are more expensive, heavier and cost more to ship.
Leave everything else at it’s default setting
Click here to see the SMD-Stencil defaults
- Stencil Type = Non-framework (changed from default of “Framework)
- Multi-level/Step stencil = No
- Size (mm): is generated automatically from the “PCB file”
- Stencil side = Top
- Quantity = 1
- Thickness = 0.12mm (the best for decent amount of solder paste per pad)
- Existing fiducials = None
- Electropolishing = No
- Other special request = Empty
Add PCB and Stencil to cart
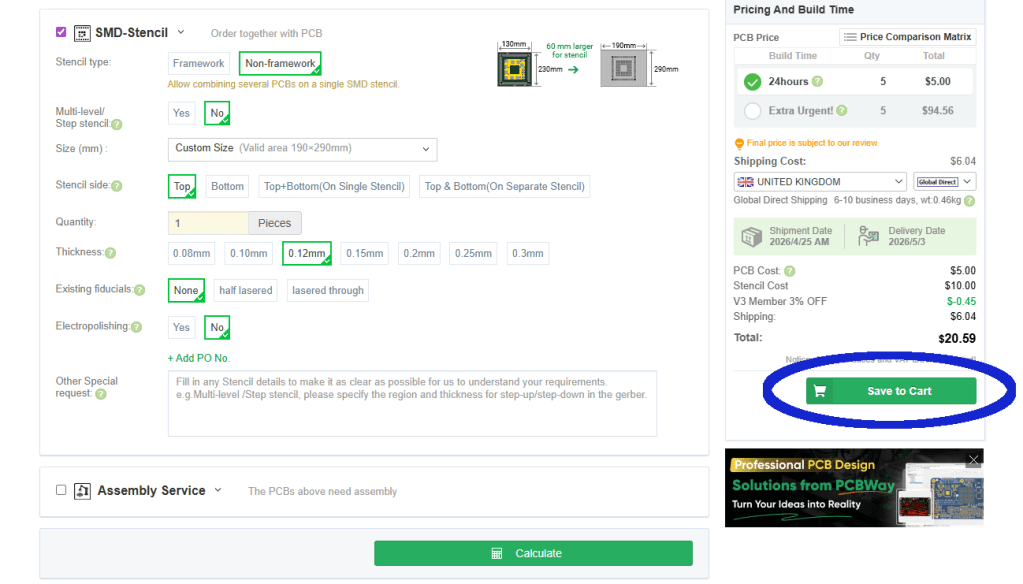
You should ignore the “Assembly Service” section, as PCBWay are not authorised to assemble these devices.
So review the selections made in 1. and 2. above, and when happy click the green “Save to Cart” Button on the left side. Shown circled in Blue.
Then agree the “Special Notes”
At the “CartList” page your “Shopping Cart/Order Review” will be “subject to review”. You cannot “proceed to checkout” yet.
The sales rep will review the order before opening it up for payment. This usually takes a few hours for PCBs and up to 2 days for 3D prints (depending on time zones).
I usually order several PCB/Stencils/3D prints at a time by returning to the “Phil Phil Atkin” page each time. And then wait until all have been reviewed, before paying. However if in a rush you can select to pay for one, or several of the orders as they are reviewed.
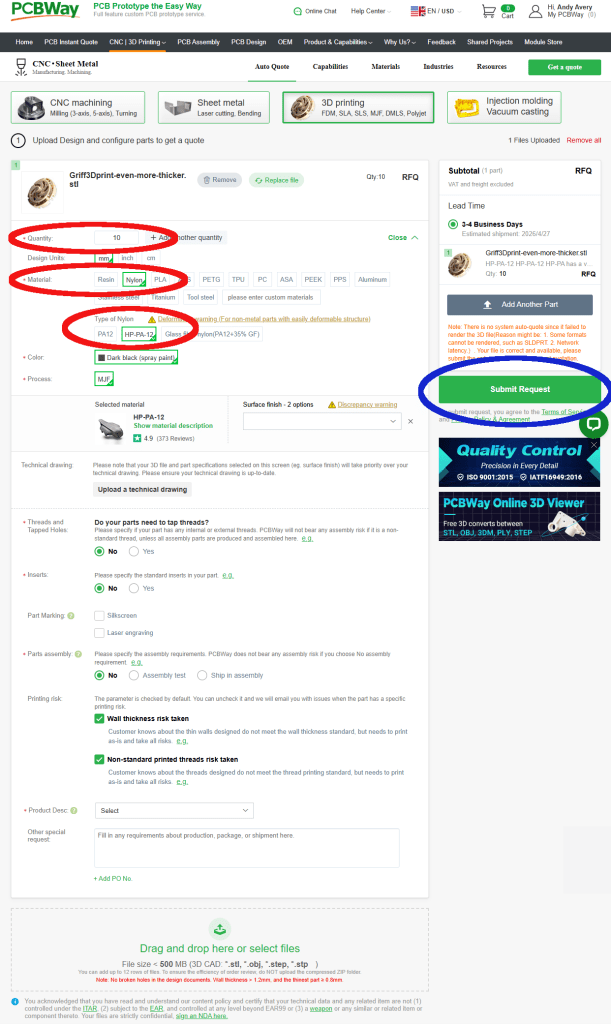
3. Order 3D prints (back covers)
These are one of the more expensive parts and vary in price from £2 to £4+ each depending on device, and ordering process.
Return to the “Phil Phil Atkin” page on PCBway and again click on the device you are interested in.

This time, scroll right down to the bottom of the page to the “CAD-Custom parts and enclosures” section.
There may be more than one option here, Phil usually adds some descriptions to help you choose. When ready click the Trolly icon next to the selected 3D print. Circled in red on the image.
Note: if you have your own 3D printer you have the option to download the .STL files to print your own at home, or via other commercial services. Sadly I’ve yet to find a UK based 3D printer than can deliver cheaper than PCBWay from China 😦
On the next page the selected print should be shown at the top. You have to configue the options then submit a request for quote” to PCBWay to get a price.
This time you need to change 3 fields. These are listed below, and also shown circled in red.
- Quantity = Number of back covers you require
- Material = Nylon
Reason: It is tough and hard wearing - Type of Nylon = HA-PA-12
Reason: “The parts have excellent impact resistance, can be used repeatedly for a long time, have excellent heat resistance, and do not deform.”
Leave everything else at it’s default setting.
Click here to see the 3D printing defaults
- Quantity = Number of back covers you require
- Design Units = mm
- Material = Nylon (changed from default of Resin)
- Type of Nylon = HA-PA-12 (changed from default of PA12)
- Color = Dark black (spray paint) (defaults when HA-PA-12 is selected)
- Process = MJF (defaults when HA-PA-12 is selected)
- Technical drawing = Not required
- Threads and Tapped Holes = No
- Inserts = No
- Part Marking = None selected
- Parts assembly = No
- Printing risk – Wall thickness risk taken = Ticked
- Printing risk – None-standard printed threads risk taken = Ticked
- Product Desc = Left blank
- Other special request = Left blank
When ready click the green “Submit Request” button on the left. Circled in Blue on the image.
.
